Something About Photography—No. 5.
Copying with a Common Camera
The instruction books tell us that we can not use the common short-focus camera for making pictures of objects closer than, say, six or eight feet. If we do, we are “sure to make a badly blurred picture that will be quite worthless.” How to overcome this difficulty is a real puzzle to many a photographer who wishes to do just this class of work.
There is a way to do it with the short-focus camera. We all know that the smaller the stop before the lens, the sharper the resulting picture will be. Objects that are quite out of focus and blurry with the full open lens are sharp and clear when a small stop is before the lens.
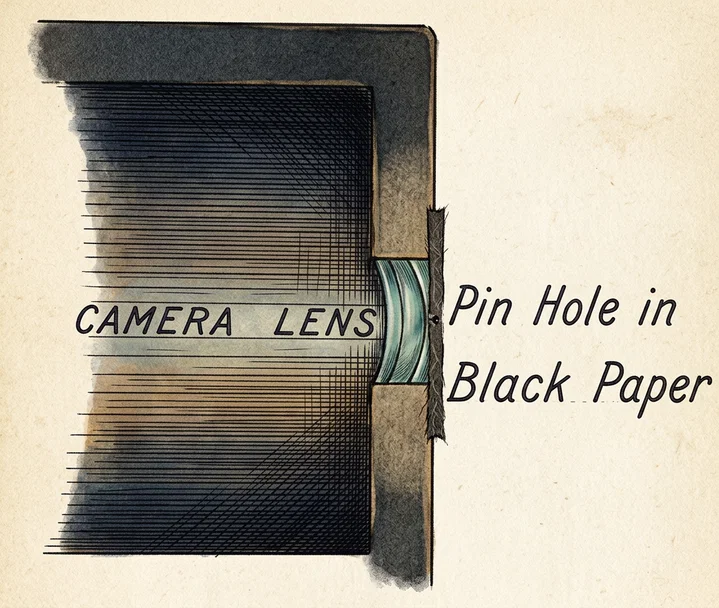
Now most cameras have small stops as well as large ones, but none are small enough for this class of work to which we refer. To get one we must make it. A piece of thin black paper is taken, and a pin or needle hole pricked through it. (If the hole is burned through with a very hot needle, it will be better, for then there will be no burr left.) This piece of black paper is now pasted just before the lens like a regular stop, and the picture of any close object may be taken with your short-focus camera. See Fig. 1. The exposure will be perhaps a hundred or more times as long as with the usual stop, but the picture will come out as sharp and clear as one can wish for. In this way pictures of fruit, flowers, and other objects can be made that would be wholly impossible with the open lens.
A Good Fixing Bath Is Made as Follows
Sulphuric acid 1 dram, hypo soda 16 ounces, Sulphite soda 2 ounces, chrome alum 1 ounce (in cold weather ½ ounce), warm water 64 ounces.
Dissolve the hypo in 48 ounces of the water, the sulphite soda in 6 ounces of water, mix the sulphuric acid with 2 ounces of water, and pour slowly into the sulphite soda solution, and add to the hyposulphite, then dissolve the chrome alum in 8 ounces of water and add to the bulk of solution, and the bath is ready. Unlike plain hypo, this bath will not discolor till after long usage, and is also a hardener of the film and a preventive against staining.
An Overexposed Plate and How to Develop It
Just what is an overexposed plate?—It is one that has been exposed too long a time to light in the camera. It develops evenly, very fast, and the shadows blacken almost as fast as the high-lights. The finished negative is wanting in contrast, full of detail, but lacking sufficient intensity in the high-lights. It is what photographers call “flat.” Of course such a negative will make but a flat and poor print.
There are several ways of making a good negative, or at least a fair one, from an overexposed plate or film. As a general thing these ways and methods will work, but they are uncertain. One plan only is adapted to the every-day beginner in photography, and is capable of yielding good average results. Let us proceed to develop an overexposed plate by it.
Presently, on pouring the developer over the plate, we notice that it begins to blacken very quickly; and all parts of it blacken almost at once. No part of it remains clear and white for a considerable time after the rest has blackened. This is an infallible sign of overexposure. The question now is, What shall we do with the overexposed plate? “Add a few drops of potassium bromide to the developer,” says one. Very well, you may do this, but you will thereby spoil your developer for any other properly exposed plates you may wish afterward to develop in it. Another photographer will say, “Remove the plate at once to another tray, containing a developer strong in pyro and bromide of potassium.” This also is good, and will work well, but either process is more or less troublesome, and there is an easier way.
Now the longer a plate remains in the developer, the more contrast it gains; that is to say, the blacker parts of the plate will get blacker and blacker, but the lighter and whiter parts will not darken as fast proportionately; and thus great contrast is possible by long development. It does not matter whether the plate is underexposed, correctly exposed, or overexposed, the longer it remains in the developer, the more contrast it will gain. Now, the common trouble with an overexposed negative being lack of contrast, we can go back and finish developing the one we just left.
The whole image has flashed up suddenly, and is rapidly growing blacker and blacker, but we neither add bromide, use strong developer, nor fix it before “it gets too black.” Remembering what we have learned about contrast, we simply leave the plate in the developer till it acquires the contrast we wish it to have, and if it has not been greatly overexposed, it will come out all right.
However, do not expect an overexposed negative developed in this way to look like a commonly exposed and developed one. No, indeed! for it will really be very, very dense. It will require a long time to print, but the chances are, it will print well. If one is impatient and really “must” make a quick-printing negative out of it, he will be able to reduce its density any desired amount in the following manner:—
Reducing Negatives
If, for any reason, a negative has been made too dense and strong, so that it requires a very long time to print, it can be made less strong and dense. The remedy is to reduce it by the following method:—
First soak the negative ten minutes in water, so as to thoroughly soften the film, then immerse in the following solution:—
Water .............................. 5 ounces Hypo-sulphite Soda ............ ½ ounce Red Prussiate Potash (saturated sol.) 20 drops
Rock the tray as when developing, until negative has been reduced to the desired density, then wash ten minutes in several changes of water. A properly developed overexposed negative, is nearly always too dense, and may have its printing qualities much improved by this method.
Two Kinds of Developing Paper
The two pictures shown herewith were printed from the same negative. One is printed on what is known as “carbon,” or “contrast,” developing paper, and the other is on “special portrait,” or “detail,” developing paper. The contrast paper yields a contrasty print, while the detail paper makes a much less contrasty one. These two papers are intended to be used with the two great classes of negatives—the contrast paper with negatives that are flat and lack contrast, and the detail paper with negatives that already have too much contrast. It is well to have a package of each on hand, and good prints can be made from almost any negative. These papers are for sale by all the dealers.
Don’t Hurry Too Much
Nearly every one appreciates beauty. If I place two pictures before you,—both good photographs, both of the same subject, but one taken from the true artist’s standpoint, and the other from the careless snap-shooter’s,—I know that you will recognize in an instant the better, more beautiful picture. And if you can do it in pictures, you can also do it in nature when you are taking pictures, if you will. That is just where the artist-photographer differs from the mere camera user: he looks at the scene and studies it till he has found the place from which it looks the best. It takes time and patience to do that way, but it pays him, and it will be profitable to you; for we who follow photography or art in a small way can not do better than use the successful methods of men whose lives are given to practical work of the same kind.
EDISON DRIVER.
1714 K St., Fresno, California.