A USEFUL DESK

8%

Review and Herald Publishing Company · Battle Creek, Michigan · Apr 20, 1899

FromThe Youth’s Instructor, Vol. 47, No. 16.

Read the full edition

A USEFUL DESK.

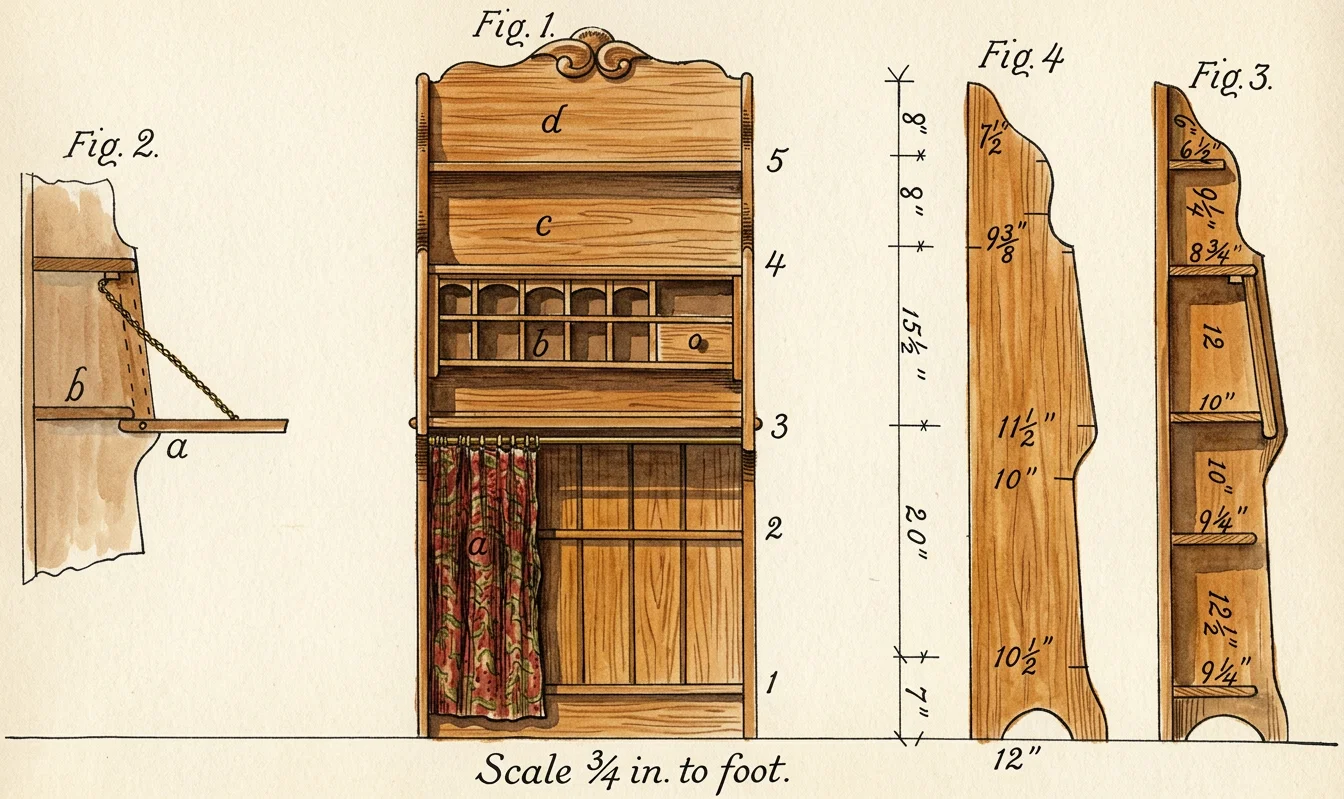
Perhaps by this time you have learned enough about the use of tools so that, with some directions, you can make a useful piece of furniture. The one here represented is the Chautauqua desk. It makes a good bookcase for a small library, also a writing-desk, with pigeonholes.
Scale ¾ in. to foot.Restored with AI
Scale ¾ in. to foot.
Fig. 1 gives the front view of the desk. It has five shelves, as you will see, numbered at the right of the desk, beginning at the bottom, 1, 2, 3, etc. In front of the lower shelves, at 3 in Fig. 1, is a brass curtain-rod, with curtain and rings, which you can draw over the shelves below. See a, Fig. 1.
At b you will see some pigeonholes. These are made of thin lumber, and shoved in between the sides. Two three-fourths-inch screws at each end will hold them in place. There is one drawer, also a shelf for paper. The lumber for these need not be over three eighths of an inch for the outside and one fourth of an inch for the divisions. Above these are two shelves, at 4 and 5.
The back of the desk, up to the fourth shelf, is made of one-half-inch lumber, placed perpendicularly, and nailed to the shelves with one-fourth-inch small wire nails. The boards on the back at c and d are placed horizontally, just the reverse of those at the bottom. These should be of the same thickness as the boards of the sides. The back to the upper part is made of two boards, which come together in the center of the top shelf, at 5.
In front of the pigeonholes is a lid, or door, that can be turned down to write on. You can make it of one board, with or without cleats nailed on the ends. The cleats would prevent its warping, but if you give attention to what I have written in a previous article, and use a piece of board from near the center of the log, with the grain running through it, the shelf will not be likely to warp.
In Fig. 2, at a, you will see the lid let down, ready for use. When lowered, it runs under the shelf at b. At the round, black spot put in a two-and-one-half-inch round-headed, nickel-plated screw. This makes the hinge for it to turn on. In Fig. 3 you will see this door closed. After it is closed, make the holes for the screws. They should come just below the shelf, so that the door, when turned down, will strike the under side of the shelf, b, in Fig. 2, which gives it a support. Then with a little brass chain, which you can get at a hardware store, fastened at each end with a small screw, the shelf will be solid. You will need to put a piece of wood about three fourths of an inch wide and three eighths of an inch thick under shelf 4, for the door to strike against.
For the sides of the bookcase take two boards about five feet long and twelve inches wide. At the left of Fig. 4 you will see a perpendicular line, with short, horizontal lines running out from it. From the bottom up to the first line is seven inches; to the next, twenty inches; then fifteen and one-half inches; then eight inches; then eight inches more to the top. Joint off one edge of your board for the sides. Square off the bottom end, then on the back edge (see Fig. 4), seven inches from bottom, make pencil mark; then twenty inches above, make another; and so on upward, according to those marked on the perpendicular line. Now a few words about getting the shape of the side boards: The bottom is twelve inches wide; at your first mark from bottom it is ten and one-half inches wide; at your twenty-inch mark, it is eleven and one-half inches wide; about four or five inches below this, it is ten inches; from ten to ten and one-half inches down the line it is straight. Now the line from eleven and one-half upward inclines, or leans, a little; so it is nine and three-eighths inches at your next mark. Just below seven and one-half inches it curves in about one inch. The bottom ends, that rest on the floor, are two and one-half inches, giving two inches rise between them. With these points in mind, you can readily mark out the sides of the desk.
In Fig. 3 the width of the shelves is given. The two bottom shelves are nine and one-fourth inches wide; the next, ten inches; the other two, eight and three-fourths and six and one-half inches respectively. The edges are rounded a little. The shelves are two feet and six inches long, and set into the sides about one fourth of an inch. Find the heights for shelves in Fig. 3.
The best wood of which to make this desk is red oak; however, you can make it of such wood as you may have. You can nail through from the outside, then putty up nicely.
What I designed to tell you this time about the use of the wood-scraper I shall have to leave until next week, as it would make this article too long.
W. K. Loughborough.