WHEN I was going to school in my boyhood, we had a blackboard made of boards matched together. We also had one put together in the same way for the singing-school. When these boards were dry, they would shrink, leaving a crack about one fourth of an inch wide. This cut the chalk, making bad work. I often wondered if there was not some way to make a board that would not crack.
I have a board in my shop now that I made twenty-three years ago. It is six feet long by four feet six inches wide, and has never shown any signs of coming apart. I will tell you how to make one.
First, decide upon the size you want your board. Then dress your lumber one-half inch thick, which will be heavy enough. Joint up the edges straight. Warm them well, and put them together with good glue. Clamp them up tight. If you have no clamp, take some pieces of scantling, as directed in a former article, and wedge them up tight. When the glue is thoroughly set, glue a piece of strong factory cloth about two inches wide over the back of the joint.
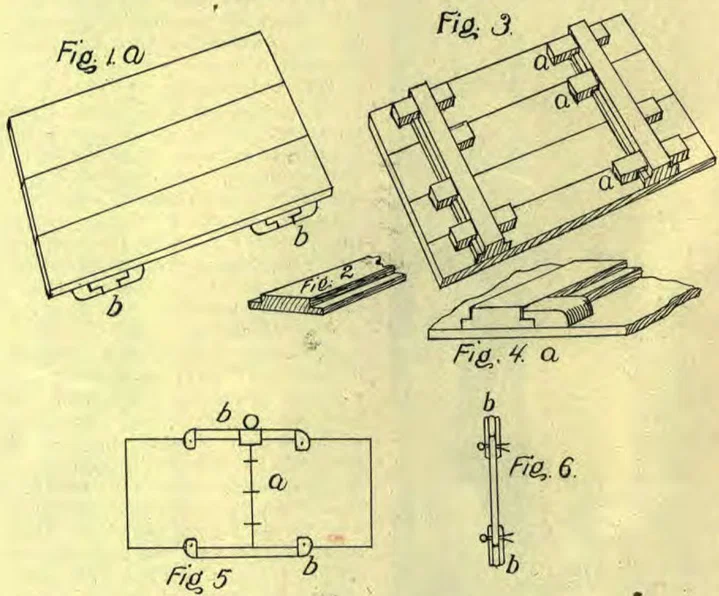
Fig. 1, a, shows the front of a board made with three boards glued together. At b, b, you will see the end of some cleats that are rabbeted out, as shown in Fig. 2. These run across the board, on the back of it, as shown at Fig. 3. These cleats, a, a, are glued to the blackboard. Put two inches of glue on one end of the cleat. Let each end of the cleats come even with the edge of the board.
In Fig. 4, a, you will see one of these cleats with a block against the cleat. Make use of a number of these blocks, as they keep the board from warping and splitting. On a board twelve inches wide it is well to use three or four on a cleat, as seen at a, a, a, in Fig. 3. These blocks should be about two inches long by an inch and a half wide. Cut a notch three eighths of an inch deep and half an inch long. Glue to the blackboard, as shown in Fig. 3. Have these blocks loose enough to slide on the cleats. Be sure not to get any glue on the cleats, to prevent their slipping when the boards shrink and swell. Now make the board smooth, and it is ready for the paint. If you follow these directions, you will have a board that will always keep its place. In damp weather my blackboard is more than half an inch wider than when I have a hot fire in my shop, because it slides back and forth on the cleats.
Fig. 5 represents a small board made to take apart. For this purpose use a board about sixteen inches wide, two feet long, and three eighths of an inch thick. Cut it in two in the middle. After it is all dressed up, put some wire pins, or dowels, in the joint at a. Get out two pieces twelve inches long, as seen at b, b, in the same figure, the thickness of the board and one inch wide. Get out and glue on some small blocks one fourth of an inch thick, as shown at b, b. The same is shown in a section, Fig. 6. Make holes through, into which insert cotter-pins. By taking out these pins, your board can be taken apart, and put into a satchel or shawl-strap; this makes it easy to carry from place to place. Paint over with black paint, using plenty of turpentine, so there will be no gloss. Some use liquid slating.
W. K. LOUGHBOROUGH.