VERY often on board ships that ply between distant ports, the sailors find themselves without work. They have painted the decks, scoured the paint off, and painted them again, over and over; they have polished the masts; they have played games, told stories, tied knots, wrestled, and done anything and everything to keep themselves busy. With so many spare hours on their hands, it is not surprising that their ingenuity should manifest itself now and then in making ingenious mechanical contrivances. So it was that the “climbing sailor” came into existence. Given the side of an old box, a few nails from the same source, a scrap of tin, and some bits of rubber pulled out of an old pair of suspenders, many a sailor with sharp knife and cunning hand has fashioned these little climbing men, and made them shin up strings often ten, twenty, or even forty feet.
This week we will make one of these little fellows, exactly following the sailor’s model; and if any one asks us what we are making it for, we will answer something like this: “For the joy that comes in seeing him grow under our eyes; for the pleasure and entertainment he affords both ourselves and the children in ascending the string; and because, though his practical utility may not be inexhaustible, the making of him is excellent discipline, training our eyes to be more true, our hands to be more steady, and our judgment to be better. And he who obtains perfect control of his hands as a boy will certainly know how to make them useful when he becomes a man. That’s why!”
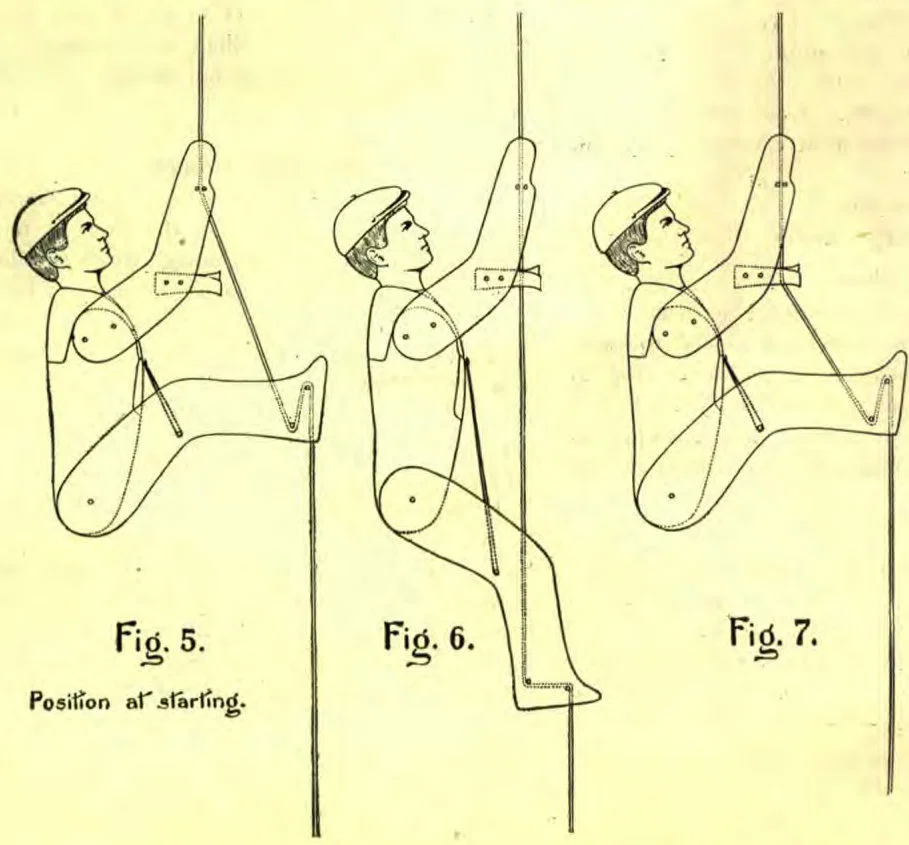
Position at starting.
First, then, as to materials. Some thin wood, any kind; some pins and a few tacks; a little piece of thin, springy tin; a small rubber band or two; some thin paper, and a piece of twine four or five feet long. Almost any boy can get these.
Next as to tools. A knife, a pair of old shears, a lead-pencil, a small nail to punch holes in tin,—these are all that will be needed.
Cutting out the Pieces
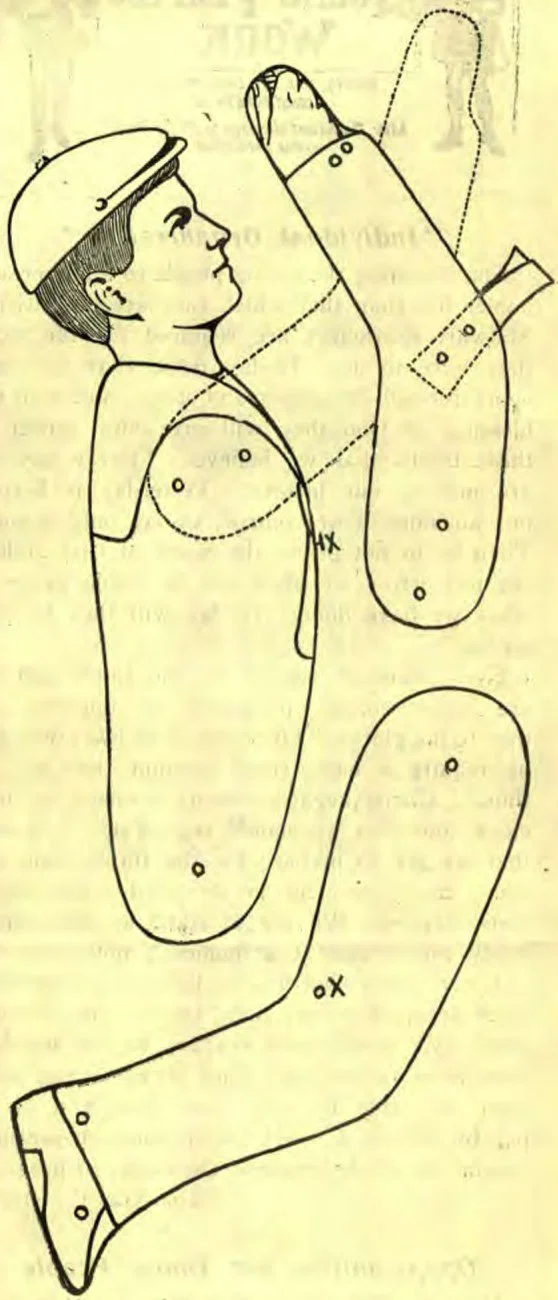
Lay a piece of thin paper over our patterns, and mark out the body, arm, and leg thereon with your pencil. Cut the figures out after you have traced them, and lay each piece on some thin, smooth wood, never over one fourth of an inch thick, and much better only one eighth, especially if the wood is fairly tough and hard. Lay the patterns on so as to take advantage of the way the grain of the wood runs, because it is very embarrassing to have a leg or an arm break in two after everything is put together.
Cut out one body, two arms, two legs; both arms just the same, and the two legs just alike.
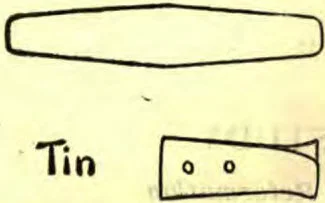
The gripper is cut out of our thin tin (or, still better, spring brass) just the size the pattern indicates. Then double it, punch two holes with a nail, and tack it on the inside of one of the arms, exactly where the picture shows it. The other arm needs none. In practise you will have to bend the gripper around some to make it catch the string just right.
Putting Together
For this purpose, tacks and pins are used. The latter should be stiff and strong; otherwise they will bend and cause trouble.
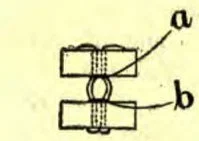
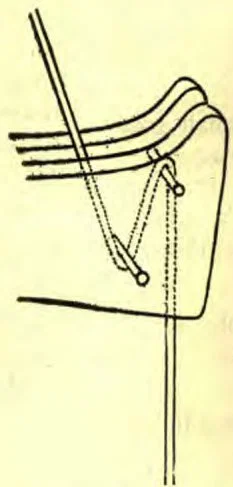
Tack the arms in place; then drive or push two pins through the hands, as shown; and double down. As you see in the figure, force a nail between the pins, to make a round hole, barely large enough for the string. If you want to be sure about the lasting qualities of this job, you would better wrap some strong thread about the pins at a and b. And, as much depends on it, I must caution you again not to make the string hole too large—just a nice loose fit is right.
Put the legs on in the proper place. These must work on a pivot, and it ought to be a strong one. A pin will do, but a small nail with two tin washers is better, driving the nail clear through, and bending down sharply. Rivet it if necessary, and work the joint till the legs move with perfect freedom.
Through the feet at the points shown pass two pins, small nails, or long tacks. Be sure to get these right as to place. Double them down if they are too long; and if weak pins are used, you may put two or three in each place instead of one. This latter suggestion applies to the hand hole as well.
Into the body’s edge at the point marked x drive two pins or a small nail to make a hook. On this fasten your rubber bands (if you have none, pull some elastic out of old suspenders or garters, and tie together). In the legs at x put another pin or two. This must be in such a place, and the rubber must be doubled so short, that it is constantly stretched, even when the legs are drawn up as far as need be.
The Artistic Work
With a lead-pencil or water colors or ink, or in any way you choose, make the little figure look more lifelike. You can make him a Chinaman, an American, or a monkey.
Stringing and Working
A piece of ordinary grocer’s twine is the thing for this climber. Pass it through the feet and hands, as shown in the dotted line.
Pull on the string, holding it by both ends; and if the gripper has been adjusted right, the little figure will climb nimbly and well.
Figure 5 shows the climber before the string is pulled.
Figure 6 is the result of a pull; the legs are drawn downward, and the string is forced into the gripper.
Figure 7. Lessen your pull; the rubber bands draw up the legs, but the gripper still holds fast to the string, and keeps the contrivance from slipping down the line,—just as a man’s hands grip a rope while he is drawing up his legs.
Figure 5 shows the result of a new pull; the string is released from the springs, the arms and body glide upward, the legs are then drawn downward, and the string is gripped again.4
By fastening one end of a long string to some solid object on the ground, and passing the other end over a high tree limb, and back down to your hand, you can stand on the ground, and, by pulling the string, make the climber go as high as you wish.