HOW TO DO DOVETAILING

6%

Review and Herald Publishing Company · Chicago; Battle Creek, Michigan; Atlanta · Apr 6, 1899

FromThe Youth’s Instructor, Vol. 47, No. 14.

Read the full edition

HOW TO DO DOVETAILING.

Our lesson this week is more difficult to put in practise than any you have yet had; but in this, as in most other things, patience and practise bring perfection. It is an encouragement to remember that Jesus worked at the carpenter’s bench, and, as we are told, “was not willing to be defective, even in the use of tools. He was perfect as a workman, as he was perfect in character. By his own example he taught that it is our duty to be industrious, that our work should be performed with exactness and thoroughness, and that such work is honorable.” So as we strive to follow in his footsteps in other things, let us strive, like him, to become workmen that need not be ashamed.
Fig. 1   Fig. 2
Fig. 1 Fig. 2
Our lesson this week is on the art of dovetailing, or so locking the corners of a box or chest together as to make them strong. Having decided how large your box is to be, get out the lumber for the sides and ends, gauge them, and dress them to an even thickness. For a common-sized work-box or handkerchief-box the lumber should be three-eighths or one-half inch thick. Make the box twelve inches long, eight inches wide, and six inches deep. Of course you can make a box any size you want, up to a chest.
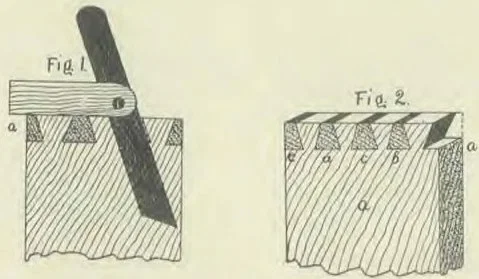
When your stuff is dressed to the desired thickness, square up the ends. Take the same gauge that you used in getting the thickness, and make a gauge-mark across each end of the sides and ends of the box, as shown in Fig. 1, a. Take your compasses, and space off the tenons, making any number you wish, and set your bevel as shown in Fig. 1. Then with the point of your knife, mark down for your tenons, square across, and saw your tenons to your gauge-mark. As I have cautioned you before, be careful to saw outside the pins and inside the mortises.
In Fig. 2 you will see one of the ends sawed ready for mortising. With your saw, cut out, as seen at a, e; then take a chisel, and cut out b, c, and d, cutting part way down from one side, then turning the board over and cutting from the other side, so as not to split your work.
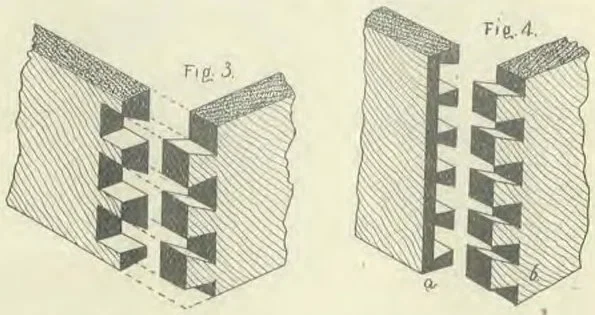
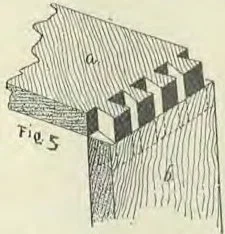
When these are cut out, take a of Fig. 2, and place it upon b, as shown in Fig. 5, making them come even upon the edge. Mark each side carefully with your knife, square down on the board, saw down and cut them out, and they will then be ready to put together, as seen in Fig. 3. Put on a little thin glue, and drive them together.
When the sides and ends are put together, fit the bottom of the box upon the inside, and glue it in. Glue the top of the box upon the top edges. Then gauge down from the top of the box an inch and a half, and with a fine rip-saw cut your box open. Dress off the edges smooth, being careful not to split off the corners. Put on your hinges and locks; but before doing this, sandpaper it smooth with fine sandpaper. In using sandpaper I generally cut the sheet into four pieces. This is best done by laying down upon the paper a fine saw or anything that will lie down tight, and then drawing up on the paper. When the paper is cut up, I rub white chalk on the smooth side, and double the pieces together. The chalk prevents the paper from slipping around, and makes it last longer.
In Fig. 4 you will see what is called a “blind dovetail.” It is used on a drawer front. You will see that it is not cut clear through to the front. The front piece has the thickness of the drawer end gauged upon the back side. Set your gauge about two thirds the thickness of the drawer front, and gauge from the back side, as shown in Fig. 4, a. Gauge the same at b.
Fig. 3. Fig. 4.
Fig. 3. Fig. 4.
I think I have told you that sometime I would tell you how to finish your work. In using wood that has an open grain, it is necessary to fill up the grains in order to get a smooth surface. If varnish is put upon the wood before the grain is filled up, it strikes in, and will give a rough surface unless several coats are applied, and it is rubbed down a number of times.
To make a filling, take equal parts of boiled linseed oil, japan, and spirits of turpentine, mix well together, and thicken by stirring in corn-starch until the mixture is of the consistency of cream. If you wish to make oak antique, put in a little vandyke brown, but be careful not to put in too much, as it will make the filling too dark. With a brush put a heavy coat upon the work, and let it stand until it is quite “tacky;” then, with some excelsior shavings or top-tow, rub it off crosswise of the grain. With some old cotton cloth rub the remaining filling all off, leaving the work smooth. Then take a sharp-pointed stick, fold the cloth over it, and clean out all the corners.
Fig. 5
Fig. 5
Let the work stand overnight, then put on a coat of shellac varnish, which will dry in a few minutes. When this is hard, sandpaper it down with No. ½ sandpaper. If you want an extra finish, put on another coat of shellac.
The best way to get your shellac varnish is to make it. You may do this by putting into a bottle one pint of grain-alcohol and one-fourth pound of orange shellac. Let it stand a few hours, shaking it up occasionally. The alcohol will cut the gum, and make it ready for use. I generally make it in a fruit-can, and leave the brush in the can, fitting a wooden cover over the top, with an opening for the handle of the brush to stick out. If the brush should be left out, it would dry up very hard, and you would have to soak it in alcohol for some time to get it ready for use. When your shellac varnish has been put on, follow it with a coat of copal varnish.
See if you can help me out with this puzzle: I want to put up a building twelve feet square. I have the sills upon the walls. I have but four joists, and they are only eight feet long. I have no more timber to splice them with. I have just one hundred and forty-four feet of floor boards eight feet long, and I can not waste an inch. How shall I go to work to lay a floor and nail the boards to the joists?
W. K. LOUGHBOROUGH.