PATTERNS AND MOLDING

9%

Review and Herald Publishing Company · Battle Creek, Mich. · Jun 8, 1899

FromThe Youth’s Instructor, Vol. 47, No. 23.

Read the full edition

PATTERNS AND MOLDING.

As mentioned in the last article, our present study is to be on molding and pattern-making. In making patterns for molding it is necessary to bevel, or, as we call it, give draft to, them, that they may be drawn from the sand without injury to the mold; and, as far as possible, it is best to avoid square corners inside, as such tend to hold the sand. To make a nice corner, warm some beeswax sufficiently to soften it, and smooth it over with the point of a knife blade that has been heated a little.
All nail-holes, brad-holes, or any other indenture should be filled with wax. Never use putty for this purpose, as sand always adheres to an oily substance. All patterns should be sandpapered smooth, and afterward varnished with shellac. When the first coat is dry, sandpaper smooth and varnish again. In this manner apply about three coats of varnish into which has been stirred thoroughly just enough lampblack to color it.
In making a pattern with a hole that has to be drawn, make the draft on the under side. I can not in this article give you all the instruction upon this subject that I would like to.
Now about molding, and the tools used for the work: The first thing required is a kind of sandy loam,—not the gray sand, which slips easily, but a yellowish sand, which, when pressed in the hand, will pack and keep in place.
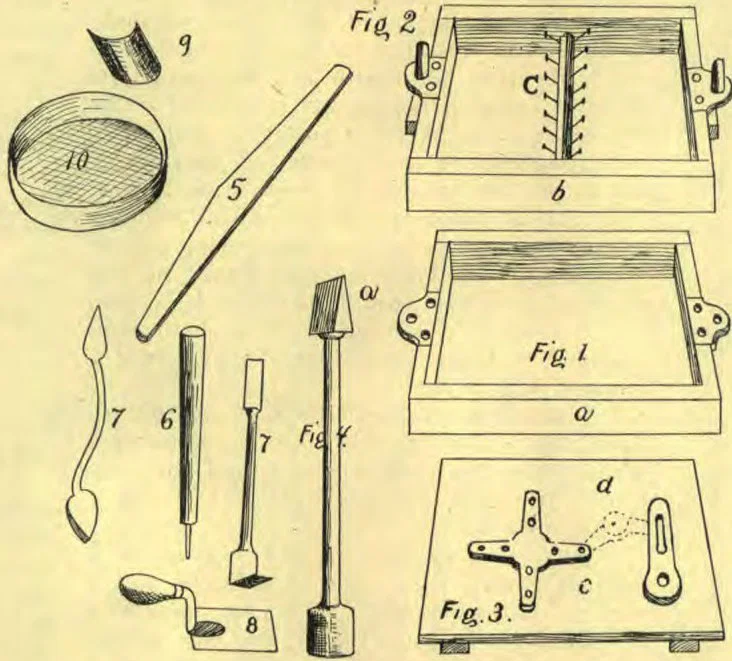
Next come the flasks. Let us suppose we have the patterns for the spider and crank to the lathe. We will make the flask about sixteen inches wide on the inside, two feet long, and ten inches deep. It is made in two parts, as shown in the illustrations. The lumber for such flasks is generally of pine, about one inch and a quarter thick. Then you want a follow-board, also a molding-board. These should be the size of the flask on the outside. In Fig. 1, a is the lower part of the flask, called the “nowel,” and b, Fig. 2, is the top, or “cope.” Upon each end of the flask you will notice some irons with holes and pins to hold the flask in place. Across the top part, or cope, there should be a crosspiece, c, running to within two inches of where the pattern comes. These are beveled from each side, with eight-penny nails driven in to keep the sand from dropping out. Pack the sand under the crosspiece with your hands. Lay down your molding-board, and place your patterns upon it. See Fig. 3. Take a, Fig. 1, and turn it bottom side up, having the irons come down on molding-board. The large side of the patterns should be placed down. Then take a coarse wire sieve (brass wire is best, as it will not rust), called a “riddle,” and sift on a little sand. See that the holes are packed with sand. Do this with your hands, not packing them too hard. Fill your flask with sand; then take your rammer (see Fig. 4), and with the peen end, a, ram around the edges of the flask. With the other end of the implement ram it all down so hard that it will stay in place. Take a stick or straight-edge (Fig. 5), and strike off the sand. Sprinkle on a little sand with the hand, put on your follow-board, grasping both sides firmly; then turn it over, take off your molding-board, and you will see your patterns. Now with a bristle brush, like a counter brush, brush off all the loose sand. See that it is full up to the top of the pattern. Then sprinkle on some parting sand (burnt sand brushed from castings when removed from the mold), and with a hand-bellows blow sand off from patterns.
To form a hole into which to pour the metal, a tool is used called a “sprue.” It is a stick about ten inches long (see Fig. 6), one inch and a quarter in diameter at the top, and three fourths of an inch at the bottom. In this end there is inserted a piece of one-fourth-inch wire, which should project two inches. Place your sprue in the sand (see d, Fig. 3), put on the cope, and with your riddle sift on sand enough to cover your patterns, afterward filling up with sand. Now, with your rammer, as you did at first, take your strike (Fig. 5), and scrape off the top. Pull out the sprue, and with your finger in the hole, rim it out on the top to make a sort of cup to turn the metal into. Take hold of the handles on the ends of the cope (the handles to the cope are blocks nailed to the end of the flask. The handle to the rammer, shown in Fig. 4, is about four feet long), and lift off the cope, letting it stand upon the side. This will separate where the parting sand was sprinkled.
From a sponge containing water squeeze a little around the edge of the pattern. Rap the pattern lightly with a small hammer; then with a gimlet having a coarse screw upon the end, carefully draw out your patterns. Afterward look them all over; and if you discover any broken places, you can mend them with a tool called a “slick.” Wet this instrument so that sand will adhere to it, and patch the broken places, slicking down smooth.
Then with a little piece of tin or brass bent up (see Fig. 9), cut your gate where it enters the mold one eighth of an inch deep, and an inch and a fourth wide from the mold to the sprue (see dotted lines at c, Fig. 3), beginning at the point from which the pattern was drawn; close together, and it is ready for the metal.
Some of the tools used are shown in the illustrations. Fig. 8 is a brass trowel for smoothing the sand. The slick (Fig. 7) is of one-fourth-inch brass wire, from six to eight inches long. Brass wire is generally tempered. To anneal it, or make it soft, heat it red-hot, afterward dipping it in cold water. After it is annealed, hammer the ends thin to the shape wanted. Pounding sometimes hardens it so that you will need to reheat it. Fig. 9 is a piece of tin or brass about three inches square, bent to a curve, to cut the gate. Fig. 10 is a “riddle.” W. K. LOUGHBOROUGH.