SOMETIME ago I promised that in a future article I would tell you how to sharpen saws. To do first-class work, it is important to have one’s saws in order. Many can work well when their tools are in good shape, but do not know how to keep the saw in the best condition.
I do not like a saw that is too hard,—that is, too highly tempered,—as it is much harder to file, and the teeth are more liable to break out in setting it. I think the saws now made, of rolled steel, are not tempered so highly as formerly, when the plates were hammered out.
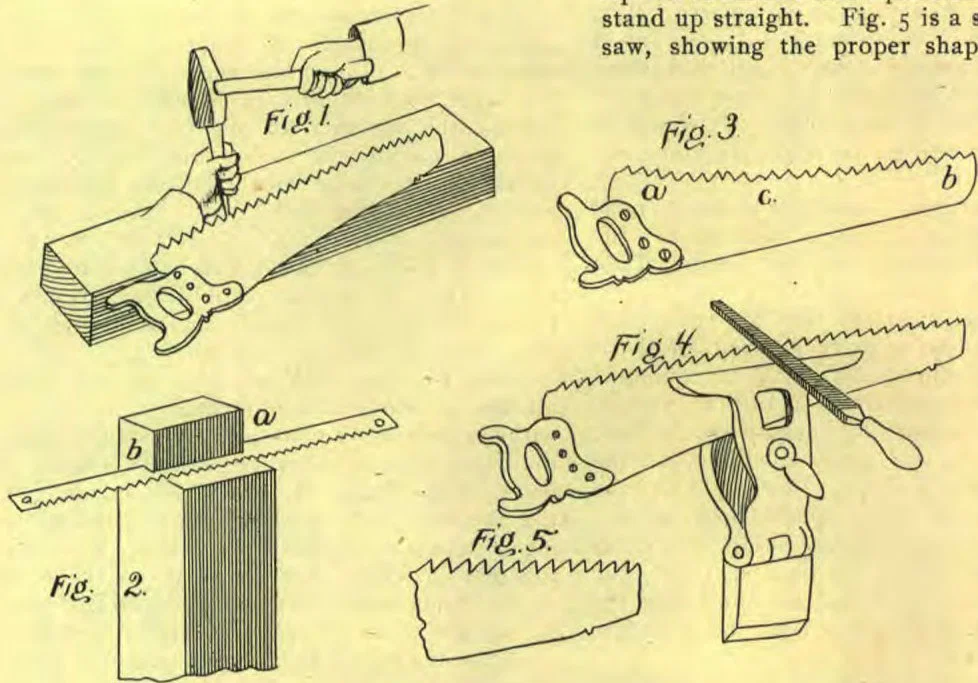
First, you must learn how to set a saw. There are many kinds of saw-sets manufactured; and some carpenters think that in order to set a saw, they must have one; but for my own use I would not give twenty-five cents for all I have ever seen. Take, as shown in Fig. 1, a piece of maple or apple-tree scantling about two and one-half feet long, and four by five inches square, plane it smooth on one side, and lay on your saw. Then take a hard nail-set, put one corner on a tooth, and with a light hammer strike a blow on every other tooth. Then turn the saw over, and go through the same process again. With a little practise, you will be able to strike blows of a uniform weight.
Fig. 3 shows a saw that was brought to me last week to be put in order. I wore out two files on it. You will notice that this saw is very concave, and therefore not straight on the teeth; also that the teeth are not of a size, or of the same shape. At a and b I filed the teeth off twice, and then filed them in again, to make the saw straight. Where this has to be done, it is better not to set the saw until after it is filed.
To run easy, a saw should be about one fourth of an inch crowning, or convex, on the cutting edge, as shown in Fig. 4. Were you sawing off a board with a saw shaped like Fig. 3, when the saw had cut to c, it would strike solid, with a “chug.” A saw gets in this condition by being filed only when dull; for instance, if you strike a nail or other hard substance, and sharpen only the dulled teeth, and follow up this practise, your saw will soon be all out of order. When such an accident happens to your saw, take a flat mill-saw file, and joint off all the teeth by lightly running the file lengthwise over them, always keeping the cutting edge rounding, as shown in Fig. 4.
Fig. 2 represents a piece of lumber in which is inserted a whip-saw. Cut out a notch, as seen at a. At b saw in a little way; and into this slit put the back of the saw. The saw being narrow, it is thus held while you set the teeth. Shove it along as you set it.
In Fig. 4 you will see a saw-clamp. Screw this into your bench vise, and place your saw in the clamp. If the teeth are uneven, run your flat file over them lightly until they are even; then, beginning at the small end, file against the front edge of the tooth. Hold the file nearly level. File off the back edge of the tooth near where you jointed it. In this way go the whole length of the saw, taking every other tooth. Then turn your saw around, and file the other side, always being careful to hold your file at the same angle with the saw, and to have the same bevel for the pitch of the teeth.
The teeth of a crosscut-saw, or cutoff-saw, should be filed “flemming;” but the teeth of a rip-saw should be filed square across, and should stand up straight. Fig. 5 is a section of a rip-saw, showing the proper shape of the teeth.
The least set you can have in a slitting-saw, the more easily it will work.
After filing your cutoff-saw, lay it down on a board or bench, and rub the sides of the teeth lightly with a whetstone. This takes off the burr that the file makes.
In filing do not bear down on your file when drawing back, but bring it back lightly. The file cuts when you shove it from you.