BLIND DOVETAILING

8%

Review and Herald Publishing Company · Battle Creek, Mich. · May 4, 1899

FromThe Youth’s Instructor, Vol. 47, No. 18.

Read the full edition

BLIND DOVETAILING.

As you have lately had one lesson in dovetailing (see INSTRUCTOR, No. 14), I will now give you a second lesson, in which I will finish the instruction on this subject. In Fig. 4 of that article is shown what I called “blind dovetailing.” However, in the true sense of the word, this is not blind dovetailing, but drawer dovetailing. Regular blind dovetailing does not show the work anywhere, whereas drawer dovetailing shows it at the end of the drawer, but not in front.
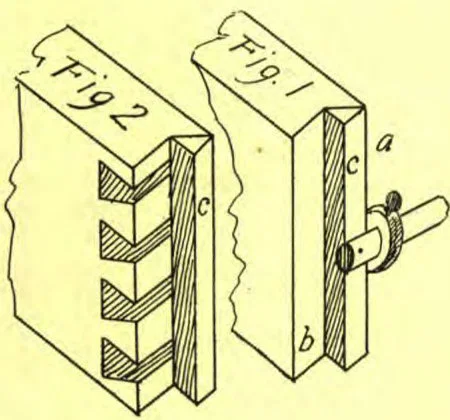
In Fig. 1 you will see a piece of the side, or end, of a box. To make this of a board three eighths or one half an inch thick, set your gauge, after the board is squared up, one eighth of an inch, and gauge on from the side, a; then turn and gauge on the end one eighth of an inch, so that when the corner is sawed out, as you will see at b, it will leave the end at c projecting one eighth of an inch square.
Fig. 5
Fig. 5
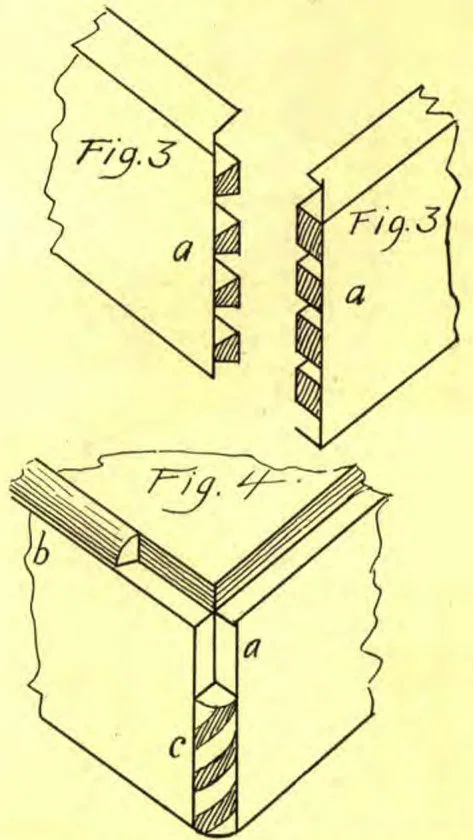
Now proceed to lay out your dovetails, as directed in the first lesson, and as shown here in Fig. 2. Observe that you do not cut through, but only up to, the projection, c. When one piece is cut out, lay it on the other piece, which has the end projecting, as at c, Fig. 1, and mark with your knife. When you have your mortises and tenons all made, take a sharp chisel and cut off the corner of c, in order to miter them, as shown in Fig. 3, a.
Be careful not to take off too much, as that would leave an open joint. As you proceed, it would be well to try the pieces together once or twice. With care and patience, you can, after you have had a little practise, succeed in doing a good job.
When a box is put together in this way, and the joints are tight, the corners of the box can be rounded off without showing the dovetail, thus giving it a nice finish.
Sometimes it is desirable to put a round corner of some other kind of wood in the box. For instance, if you were making a box veneered with maple, and wanted a dark border, such as black walnut or rosewood, you would gauge on from the inside of your lumber, and up on the ends about one half the thickness of your lumber, and dovetail as in the box described above, except that you would not allow the end to project. On the contrary, there would be a corner without anything in it, as seen in Fig. 4, at a. To fill this corner, you could get out a piece of wood about one fourth of an inch square, fit it in nicely, and glue it to the box. Wind a piece of cord or strong twine around the box, to hold the pieces in place until the glue is set, when the corners can be rounded up.
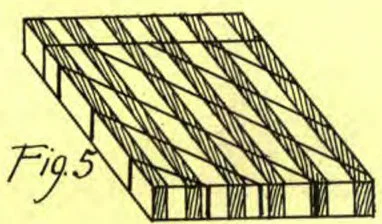
At b, Fig. 4, you will see a plain piece of wood inserted and rounded. At c, Fig. 4, a fancy corner is shown. In making a box of this description, the top and bottom should project the same as the corners. To make the fancy corners, use two or more kinds of wood, as you like. Dress them out one fourth of an inch wide, one eighth of an inch thick, and about a foot long, and glue them together in alternate layers, as shown in Fig. 5. When the glue is set, saw them into strips, either square or diagonal, as shown in Fig. 5, and glue them in, the same as you would the plain strip. Afterward round off, file, and sandpaper smooth. This makes a pretty finish. See c, Fig. 4.
Next week I will give you some instruction in veneering. W. K. LOUGHBOROUGH.