INSTEAD of a workbasket, with spools of thread, buttons, scissors, embroidery hoops, etc., all crowded into a small space, a screen can be used, which has a definite place for every article used in sewing. The spools of thread are kept on brass pegs; the silks in one place and the cottons in another. The scissors, pincushion, and emery ball are suspended from hooks. Patterns, embroidery hoops, buttons, etc., all have pockets where they are readily accessible and yet kept in good shape. Best of all, the screen is light and can be easily carried from one room to another, or onto the veranda. In sewing, a small shelf may be lowered for holding the work. With a few materials any one handy with tools can make this ornamental and useful piece of furniture. The materials needed are as follows:—
WOOD FOR FRAME
- 4 pieces 42 by 1½ by ¾ inches.
- 9 pieces 12¼ by 1½ by ¾ inches.
- 1 piece 12⅛ by 9 by ½ inches.
- 1 piece 12¼ by 3¼ by ¼ inches.
- 1 piece 12¼ by 1¾ by ¼ inches.
- 1 piece 12¼ by ¾ by ¼ inches.
LEATHER FOR COVERING
- 2 pieces 13¾ by 36 inches.
- 1 piece 13¾ by 8 inches.
- 1 piece 13¾ by 4 inches.
- 35 brass pins, 2 inches long; 4 short screws
- 2 hinges, and screws; 12 hooks
- 1 hook and eyebolt; 100 fancy tacks
- 2 handles, and screws; 50 nails
Select two of the longer or upright pieces, and on them indicate with a pencil the points for attaching the crosspieces. Suppose the left-hand side of the screen is to be made first. The upper edge of the uppermost crosspiece should be 1½ inches from the tops of the posts. The top surface of the next lower crosspiece should be 13¼ inches from the tops of the posts. The one next the bottom is 31½ inches from the top; and the under surface of the bottom piece is 4¼ inches from the floor.
On two of the crosspieces drive seven long brass pins an equal distance apart, as shown in the illustration, taking care to have their tops all even. It is better to drill holes slightly smaller than the pegs before putting them in, especially if the wood is oak or other hard wood. Into the under surface of the top crosspiece screw seven eyebolts, as shown.
Next, assemble the posts and crosspieces. Use fine wire nails, being careful not to split the wood. Strong, hot glue should be applied at the same time to secure greater strength. Before proceeding, allow the work to become thoroughly dry.
On the inside of each of the two upright posts, about ⅜ inch from the back edge and 22 inches from the top, insert a screw, allowing it to protrude about ¼ inch. Then, holding the shelf, which is the rectangular piece, 12⅛ x 9 x ½ inches, in position, with its upper edge just under these screws, locate the two points for its pivoting screws. This is clearly shown in the illustration. The pivoting screws will work more easily if the holes are first made with a slightly larger screw. The back screws hold the shelf in a horizontal position when it is being used. At other times, it can be raised to a vertical position between the posts.
The top and bottom pieces on the right side have the same location as those on the left. The second crosspiece is 10 inches from the tops of the posts. Just under it is attached the piece 12¼ x 3¼ x ¼. This piece does not need to be nailed; glue will answer. Attached to its under edge and projecting forward horizontally, is the narrow strip, 12¼ x ¾ x ¼. Attached to the front edge of this piece, and slanting forward obliquely, as shown in the illustration, is the piece, 12¼ x 1¾ x ¼. These three pieces should be nailed to one another with two or three fine wire nails, which can be readily concealed.
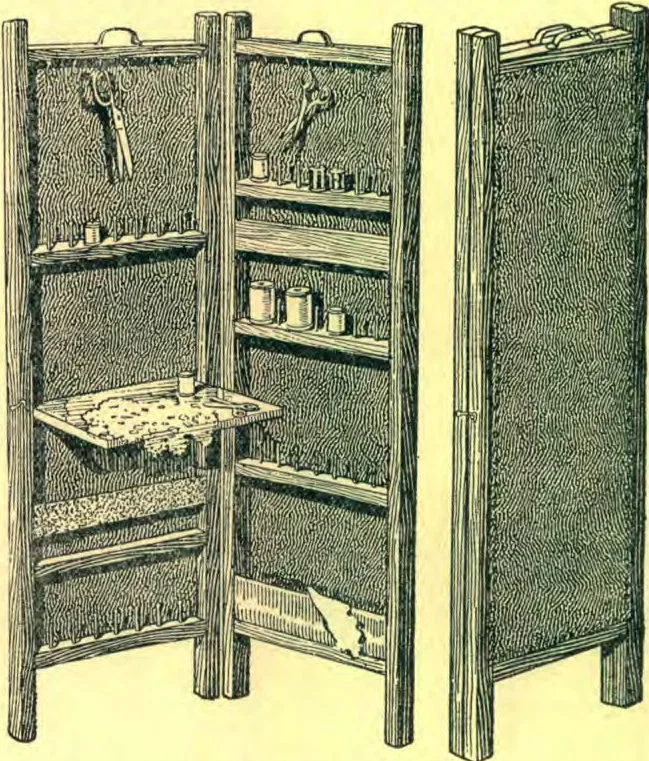
The third crosspiece on the right is 18½ inches and the fourth piece 27 inches respectively, measured from the tops of the posts. Before joining them to the uprights, they should be fitted with brass pins, as shown. The top piece should be provided with hooks.
Before proceeding farther, the various parts should be varnished, stained, or painted, according to individual taste. If the screen is to be used in a bedroom having white woodwork, white enamel may be used to advantage. If the woodwork is mahogany or oak, the screen may be finished to match. After the parts are thoroughly dry, the leather or other covering is put on. If leather is used, it should match not only the finish of the screen, but the color scheme of the room. If white enamel is used, a pretty chintz pattern is very effective as a covering, or silk may be used. In putting on the leather or chintz, be careful to stretch it tightly over the frame, gradually proceeding from top to bottom, inserting the tacks on both sides simultaneously. The edges should be folded in about ¼ inch; and the tacks should be driven into the middle of the frame. If silk is used, it may be shirred on a cord at the top and bottom, instead of being tacked. The two inside strips which form the pockets at the bottoms are attached by turning in their edges and tacking on the inside. The measurements given are large enough to allow for folding in the upper edges several inches.
Lastly, fasten two small brass hinges on the back, 7½ inches from the top and bottom, respectively. On the front, attach a hook and eyebolt, 18½ inches from the top, for holding the two parts of the screen together when not in use. On the top crosspieces fasten two brass handles, as shown. They should be near the front inner edge of the frame, so that they will come together when the screen is closed.—Popular Science Monthly.