Building a Modern Kite

3%

Review and Herald Publishing Assn. · Washington, D. C. · December 15, 1903

FromThe Youth’s Instructor, Vol. LI, No. 50

Read the full edition

Building a Modern Kite

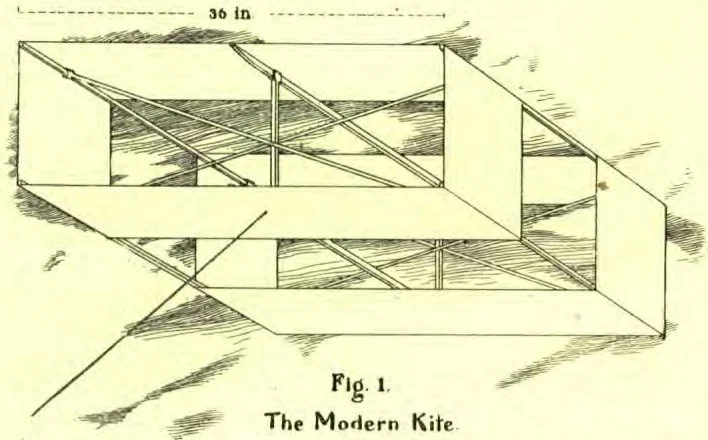
Fig. 1.
The Modern Kite.
Fig. 1. The Modern Kite.
The kite we will make this week is a simplified model of “the great cloth bird” at Blue Hill Observatory, near Boston, where it has been used for several years in elevating recording thermometers and other instruments that automatically register the condition of the upper air. This big, standard kite of Uncle Sam’s Weather Bureau contains nearly seventy square feet of supporting surface, and often pulls over a hundred pounds on the string. Of course no one man can fly it safely by hand; and so strong, well-anchored reels are used instead. The string itself is a fine steel wire about the diameter of an ordinary pin, and usually between two and three miles long. It will not break with any strain under two hundred pounds, and therefore is strong enough except when several kites are flown tandem, in order to explore the very highest altitudes.
Notwithstanding its marvelous lifting power, the modern scientific kite hovers for hours with the smoothness and grace of some gigantic bird. It is even possible to take photographs of the earth, by cameras suspended from this kite.

The Model

A boy who is handy with his knife, and can induce a patient, long-suffering sister to do some sewing for him, will have no trouble in making his scientific fun machine. It certainly calls for more time in construction than the old “cross-stick” kite, but it also certainly repays the labor bestowed on it far better. Whoever undertakes it has just two points to be careful of: First, the frame must be stiff; second, it must be well balanced.

Materials

Straight-grained spruce or pine is the thing for the framework sticks; three yards of calico or muslin, or an old sheet, will do for the covering; and some small tacks and coarse, waxed linen thread will fasten things together.

Sizes

You can make your kite any size you wish, of course, as soon as you understand the principle on which it flies. However, as in the construction of yachts, so in the construction of this model kite, certain proportions have been found to work best; and, to begin with at least, it will perhaps be safest to hold closely to these. The pieces of wood you will need are cut as follows:—
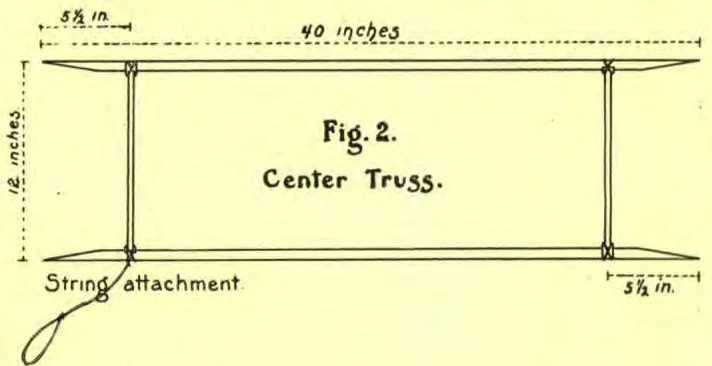
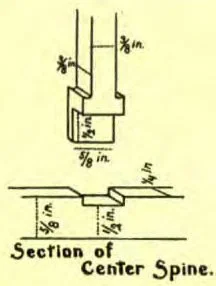
Figure 2.— 2 center spines for center truss, ¼ x ⅝ x 40.
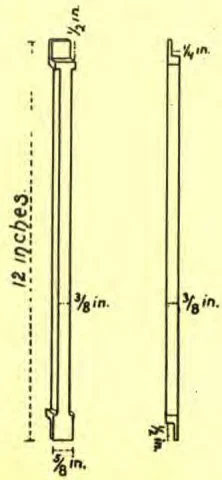
Figure 3.— 2 vertical supports for center truss, ⅜ x 1 x 12.
Figure 4.— 4 corner spines, ⅜ x ⅜ x 40.
Figure 5.— 4 diagonal braces, ¼ x ⅝ x 37¾.
The figures will show just how and where to notch the wood in order to make the framework perfectly rigid, and also where to trim away unnecessary weight.

Building

Having the twelve pieces necessary, build first the center truss, or backbone, of your “bird,” as shown in the figure, by binding the four pieces made for it firmly together with plenty of shoemakers’ waxed twine, or common string, waxed.
The next step is to prepare the covering. This is made of two long strips of cloth. Both edges must be hemmed, and still leave the width just twelve inches. The total length on the kite for each strip is ninety-six and one-half inches,—the one-half inch being allowed for the lap in sewing the goods together.
Now mark the two cloth bands at the places they are to be fastened to the framework. In order to do this, stretch each band on two sticks, make it tight and firm, and lay off on it a twelve-inch section, draw it around a little, so that the stretching sticks will not interfere, and with the pencil mark off a thirty-six-inch section, then a twelve, then another thirty-six. Do not hurry in this part of the work, as on it depends a great share of the kite’s success. Complete the marking by drawing two lines where the center truss will come, just in the middle of the thirty-six-inch sections.
Fig. 5. Diagonal Braces.
With some of the small tacks fasten the bands to the center truss in the proper places, using half a dozen tacks in each place. In the same manner fasten in the corner spines, taking care that the notches you have made in them come right for the diagonal braces.
In the measurements for the sticks the diagonals were placed at about 37¾. It is well to make them even a little longer than that, in case your cloth should stretch considerably, and trim them down till they fit snug, and stretch the cloth outward as tight as a drum, so to speak. Notice that one diagonal goes before and one behind the vertical of the center truss, and that they are bound together at every joint with the waxed string.
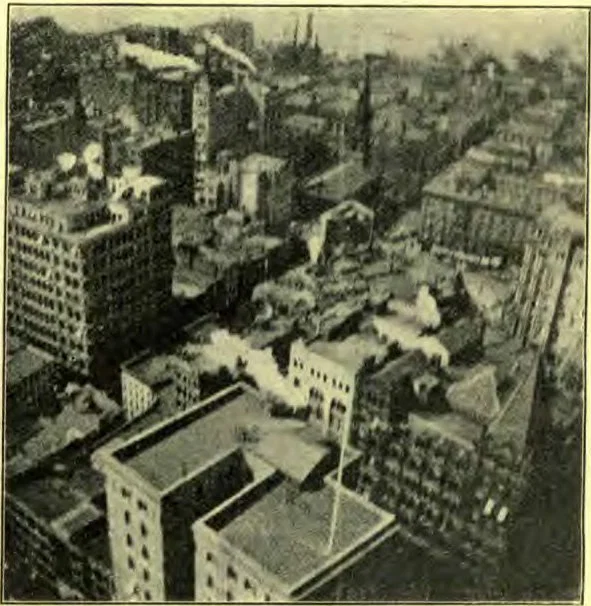
A KITE PHOTOGRAPH TAKEN IN NEW YORK CITY
AT FIVE HUNDRED FEET ALTITUDE
A KITE PHOTOGRAPH TAKEN IN NEW YORK CITY AT FIVE HUNDRED FEET ALTITUDE

Attaching the String

There are two methods, one for light and one for heavy winds. In the second method a piece of cord is tied to the center truss, as shown in Figure 2, passing it through small slits in the cloth. The other end of the cord is made into a loop, into which the kite string proper may be tied. The first method, for light winds, has the two-point fastening. This will be understood from Figure 6. It may be necessary to make several trials, in order to get the exact slant to the kite as it hangs from the string; this of course will be effected by fastening the real kite string to just the right part of the bridle.
The kite string should be a great deal stronger than that needed for the ordinary kite. However, it is probable that in ordinary winds the common twine will do very well. If it is found too weak, it can be strengthened by waxing with beeswax.

Sending It Up

The best time to fly the kite is during what we would call “a common wind.” Run out a hundred feet or so of string while somebody else holds the kite. Have your assistant toss it lightly upward in the direction in which it is to go. It will then take care of itself, and mount rapidly.
Fig. 3.
Verticals of
Center Truss.
Fig. 3. Verticals of Center Truss.
Section of Center Spine.
If the kite is not thrown up in line with the wind, it will behave badly, as any other kite would do. It may behave badly in either case, and this is a sure sign that it is poorly made. It is not balanced, and should be weighted on one side or the other with small pieces of lead or iron, tied to the corner spines. This will usually make matters right, and the kite will sail so high that, large as it is, it will be almost lost to view, provided, of course, your string is long enough, and the wind sufficiently stiff.
Boys who have flown ordinary kites tandem, several from a single string, will know how to do the same thing with their scientific kites, and will appreciate the absence of the troublesome tail. They will also find it possible to send up heavy flags, lanterns, fireworks, or cameras. Many strange pictures can be secured by swinging a light camera between the two cells of the kite, so that it is well balanced, providing some simple way of working the shutter, and taking bird’s-eye views of farms, towns, and valleys. The photograph shown herewith was taken in this way in New York City several years ago.
Edison Driver.